

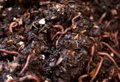
Vermicompost is the product of the composting process using various species of worms, usually red wigglers, white worms, and other earthworms, to create a heterogeneous mixture of decomposing vegetable or food waste, bedding materials, and vermicast. This process of producing vermicompost is called vermicomposting. Vermicomposting that is composting with worms is super easy and great for plants. All you need is a box that you put some worms in and some organic material.
Vermicompost contains water-soluble nutrients and is an excellent, nutrient-rich organic fertilizer and soil conditioner. It is used in farming and small scale sustainable, organic farming. Vermicomposting can also be applied for the treatment of sewage sludge. Furthermore, a variation of the process is vermifiltration (or vermidigestion) which is used to remove organic matter, pathogens and oxygen demand from wastewater or directly from blackwater of flush toilets.
Type of earthworm in Vermicompost:
Redworms improve the quality of the soil as it recycles the organic waste of different life forms into humus. Based on feeding and burrowing habits four types of earthworms are cultivated in vermiculture. They are stated below:
-
Endogeic: These earthworms are characterized by burrowing. They usually create a horizontal burrow and they feed on the material present at the deep surface of the soil. E.g. Pentoscolex, Eutopeiusspp., Drawida spp.
-
Epigeic: These redworms are found on the upper surface of the soil. They feed on soil fitter. They are not for burrowing. They are usually red, brown, and red-brown. They are small in size and do not contain stripes unlike other types of redworms. E.g. Eisenia foetida, Eudrilusengenie, Perionyx exacavatus
-
Anecic: They create a vertical burrow and they feed on a soiled litter. They are found in the upper part of the soil and in deep soil burrows. In grasslands, castings of these earthworms can be found. E.g. Polypheretimaelongate, Lampito marutt
Method to make Vermicompost at home:
Step 1: Buy and Prepare the Bin: Drill holes in the sides of the storage bin, bottom and top (too few or too many holes can be a bad thing, so keep the total number around 20) for air circulation and drainage. Buy a bin that is opaque and not clear as the worms need for it to be dark inside.
Step 2: Find a Spot for the Compost Bin: Placement of the compost bin is important. Many apartment complexes don’t allow storage on balconies, so you may have to strategically hide the compost bin so it is not visible from the outside. Also, keep the bin in a shady spot. You don’t want the worms to get too hot or have too much light.
Step 3: Shred Paper for Bedding: Shred newspaper into thin strips to make bedding for the worms you will add. Avoid glossy paper, such as the paper ads are often printed on. Newspaper and the paper inside of phone books are safe for composting worms because the inks used in this paper are strictly regulated by the government. Any other paper is questionable, so recycle any other paper in another way. Cardboard, such as toilet paper tubes, and egg cartons are also suitable for worm bedding. Spray the paper so that it is moist, but not soaking wet. Always keep the bedding at this moist consistency.
Step 4: Add Food and Wait: Add a little bit of food and a small scoop of dirt and wait for about two weeks. The food grows a good crop of microbes that the worms will eat.
Step 5: Add Worms: Eisenia foetida, or red worms, are the best worms for your vermicomposting bin. You can find boxes of them at your local garden centre or order them online. They should breed in your bin, so you should only need to invest in worms once. Don’t put earthworms in your bin. They will die and your compost will fail.
Step 6: Feed the Bin: You will be "feeding the bin" (instead of feeding the worms) because although worms do eat some of the waste material put into the compost bin, they mostly feed on the microbes that break down the waste. Good food to put in the bin includes fruits and vegetables (feed citrus in moderation), coffee grounds, tea bags and crushed eggshells. For foods to add only in moderation include citrus, starches (bread, rice, etc.), spicy peppers, onions, oily food and sugary food. Never add meat or dairy, or any kind of human or pet waste. Don’t add too much food. Watch the bin and see what foods break down and what foods don’t. Foods like lettuce break down right away, while banana peels take a long time to decompose. When you feed the bin, add new shredded newspaper or spray with water, if needed.
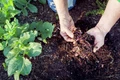
Step 7: Harvest the Castings: In a few months, there may be some nutrient-rich worm castings that you can harvest from your bin and use as fertilizer for your garden plants. To harvest the castings, get another container and a plastic bag with holes cut into it. Place the bag over the top of the new container, and make sure it’s taught over the opening. Put the new container in the sun, and start putting the contents of your worm bin onto the top of the bag. The worms will burrow through the holes and into the new container because they don’t want to be out in the sun. This way you can separate the castings from the worms. When you are done harvesting, put the worms back into their compost bin.
The importance of vermicomposting by worms in agriculture is that they bring about the decomposition of organic matter and help in mixing organic matter in the soil. Apart from this they alter soil porosity, Increase the activity of microbes in the soil they make available organic material as food for crops/plants. Earthworms increase the water holding capacity of the soil so that roots of the plants grow deep in the soil and also increase the aeration capacity of soil with the increase in percolation of water and soil fertility.